


Quick answer: To set up a Shopify store, create an account and choose a plan, connect a domain, pick and customize a theme, add products and collections, configure payments, shipping, taxes and policies, then place a test order and turn off private mode to launch. This guide walks through each step in that order.
Lately, I’ve developed a habit. Whenever someone mentions a brand, I instinctively pull out my phone and check their website. That first digital impression often decides whether I’ll trust the brand or not.
A website, or rather, a thoughtfully crafted one, sticks with you. And it’s not just about aesthetics.
Just recently, while searching for dog food for my pet, I stumbled upon a website that immediately caught my eye. It looked professional, had seamless navigation, clear product descriptions without the fluff, real product images, genuine reviews, and smart product placements. I ended up buying not only dog food but a few toys too.
That’s the power of effective Shopify store setup, it makes selling online smooth, smart, and seamless.
In this blog, we’ll break down everything you need to know about building a Shopify store that doesn’t just look good, but sells.
Let’s start with the basics.
Why Proper Shopify Store Setup Matters?
Your Shopify store isn’t just a place to list products, it’s your brand’s first impression, sales funnel, and customer experience center all rolled into one.
A poorly set-up store can lead to:
Confused visitors who drop off without buying
Broken trust due to missing details or clunky navigation
Low conversion rates, even with great products
But a thoughtfully set-up store can:
Guide customers effortlessly from browsing to checkout
Build credibility through clean design, clear messaging, and fast load times
Increase average order value with smart product placements and upsells
Set your business up for long-term growth and scalability
Think of your store as your 24/7 salesperson. Would you want it to be unprepared and confusing, or confident and helpful?
So, now that we understand how important right Shopify Store setup is for your business
Pre-Setup Essentials
Before you jump into the themes and products, there are a few critical boxes to check. These pre-setup steps lay the groundwork for a smooth and secure store launch.
Domain Setup and Configuration
Your domain is your digital address, making it memorable and relevant to your brand.
Options:
Buy a new domain directly through Shopify (easy setup, auto-configuration).
Connect an existing domain if you already own one via providers like GoDaddy or Namecheap.
Pro Tip: Always go for a .com if available. It's usually the easiest extension for customers to remember and type.
You can also transfer a domain you already own to Shopify. If you connect a third-party domain instead, you update its DNS records at your domain provider. According to Shopify, connected domains usually start working within two hours but can take up to two days. Shopify also issues a TLS (SSL) certificate for connected domains, so your store loads over HTTPS. Check that the domain shows as Connected on the Domains page before you launch.
Create Your Shopify Account & Select a Plan
If you haven't already, sign up at Shopify.com and start your 3-day free trial.
Once inside:
Fill in your store name, business address, and other details.
Select a plan that suits your business stage. (You can begin with the Basic Plan and upgrade as you grow.)
Add your billing details to avoid any disruptions post-trial.
Shopify’s current plans are Basic, Grow, Advanced and Plus. Plus is built for high-volume and enterprise brands; if that could be you, read our guide on whether Shopify Plus is the right fit for your business.
Reminder: You can fully explore and set up your store during the trial. You’ll only be charged when you pick a paid plan.
Trial length and any introductory pricing that follows can vary by location and promotion, so check the free trial details on Shopify’s help centre before you sign up. If a trial ends without a plan, your store is paused until you choose one, and your work is kept.
Enable Maintenance or “Coming Soon” Mode
Before your store is ready for the public eye, keep things under wraps with a “Coming Soon” or password-protected landing page.
Here’s how:
Go to Online Store > Preferences.
Scroll to the Password Protection section (labelled Store access in the current Shopify admin).
Enable it (Shopify calls this private mode) and write a custom message (e.g., “We’re getting ready to launch something amazing!”).
Share the password with testers or team members only.
This ensures you can build freely while keeping things private until your launch day.
New stores start in private mode by default, and checkout stays inactive until you turn private mode off or choose a paid plan.
Shopify Store Structure Overview
Even the best of gems of your store can stay unfounded if the store isn’t structured the right way. Your store’s structure completely depends on your product category, number of collections, classifications, and more. But there is a one hierarchical structure that is proven to work for most of the ecommerce stores and that -
The Core Hierarchy:
Home > Collections > Products > Pages > Blog
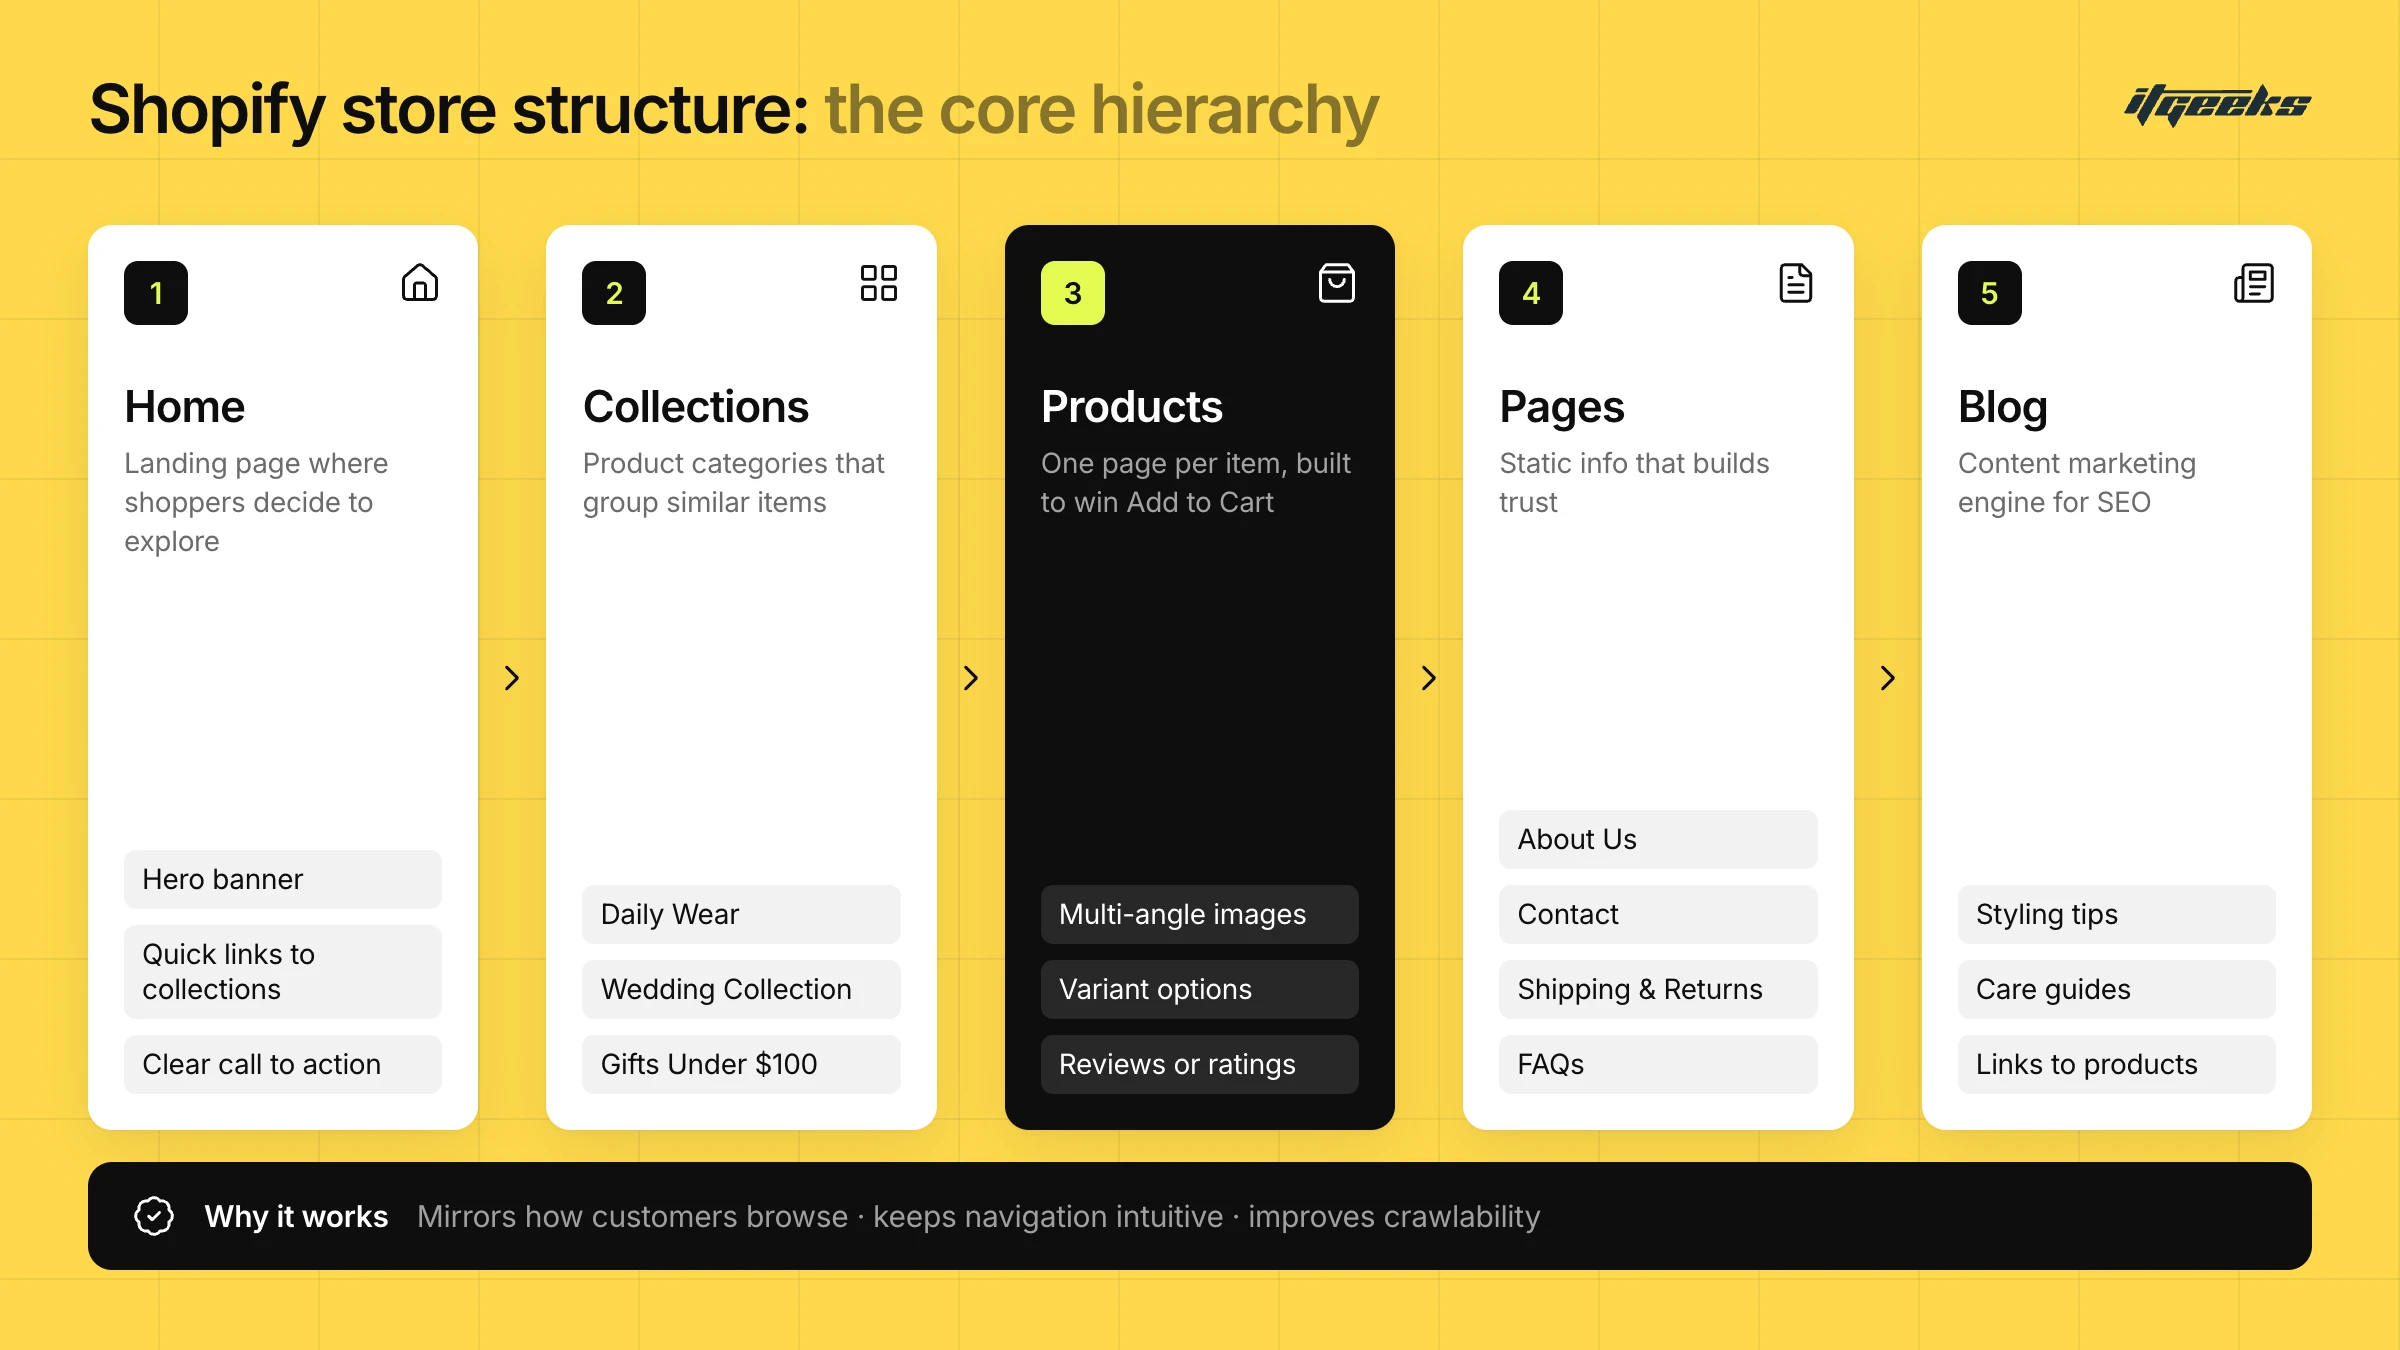
Let’s break it down -
Home -
As the very name suggests, it is your store’s landing page - this is where your customers make the decision - whether or not they want to explore your products. Hence, it must be aesthetically pleasing, smooth functioning, navigational.
So for example, if you own a jewellery store, your homepage can feature:
A hero banner showcasing new or best-selling pieces
Quick links to key collections like Earrings, Necklaces, Bridal Sets
Customer testimonials or social proof
A featured blog post on styling tips or jewellery care
A clear call-to-action (CTA) like Shop Now or Explore the Collection
Want to go deeper on the homepage? See our guide on how to design a high-converting Shopify homepage.
Collections
These are your product categories. They help customers navigate your store quickly by grouping similar items together.
In the jewellery store example, collections might include:
Daily Wear
Statement Pieces
Wedding Collection
Gifts Under $100
Collections can be manual (you pick which products go in) or automated (Shopify adds them based on rules you set, like tags or price ranges).
Products
Each item gets its own dedicated product page. This is where you convince the customer to hit Add to Cart.
Make sure your product pages include:
High-quality images (multiple angles)
Clear, concise descriptions
Variant options (like metal type or size)
Reviews or ratings
Related products or “complete the look” suggestions
Static Pages
Static pages are your go-to spots for static information. Every store should have:
About Us
Contact
Shipping & Returns
FAQs
Pages don’t change often, but they build trust and answer key questions that might block a purchase. For page ideas and setup tips, see our ultimate guide to static pages on Shopify.
Blog
This section is your content marketing engine. Great for SEO and for building customer relationships over time.
Ideas for a jewellery store blog:
How to Style Minimalist Jewellery for Work
5 Mistakes to Avoid When Buying Wedding Jewellery
Jewellery Cleaning Tips at Home
Internal linking between blog posts and product/collection pages improves discoverability and helps with search rankings.
A must read for more detailed information on Shopify Website Development.
Why This Structure Works:
It mirrors how customers naturally browse
It keeps navigation intuitive
It improves search engine crawlability
It lays the groundwork for marketing, retargeting, and analytics
Step-by-Step Shopify Store Setup
Theme Selection and Customization
Theme Selection
Whether you open Amazon; the app or its website, one thing stays the same: the branding. The colors, layout, product displays, and experience feel familiar across devices. That’s not just good design; that’s deliberate customization, and your Shopify store needs that too.
Why Theme Matters
Your theme isn’t just about how your store looks, it shapes how it functions. A clean, user-friendly, and on-brand theme:
Makes navigation easier
Increases time spent on site
Builds trust at first glance
Encourages conversions
Start with the Shopify Theme Store
Shopify offers a range of free and paid themes. Each one is mobile responsive and built with performance in mind.
Shopify’s own free Horizon theme is a good example of a free starting point. Not sure which theme suits your catalog? Our guide on how to choose the perfect Shopify theme compares the options.
Free Themes: Great for startups or simple catalogs
Paid Themes: More customization options, features like mega menus, advanced filtering, etc.
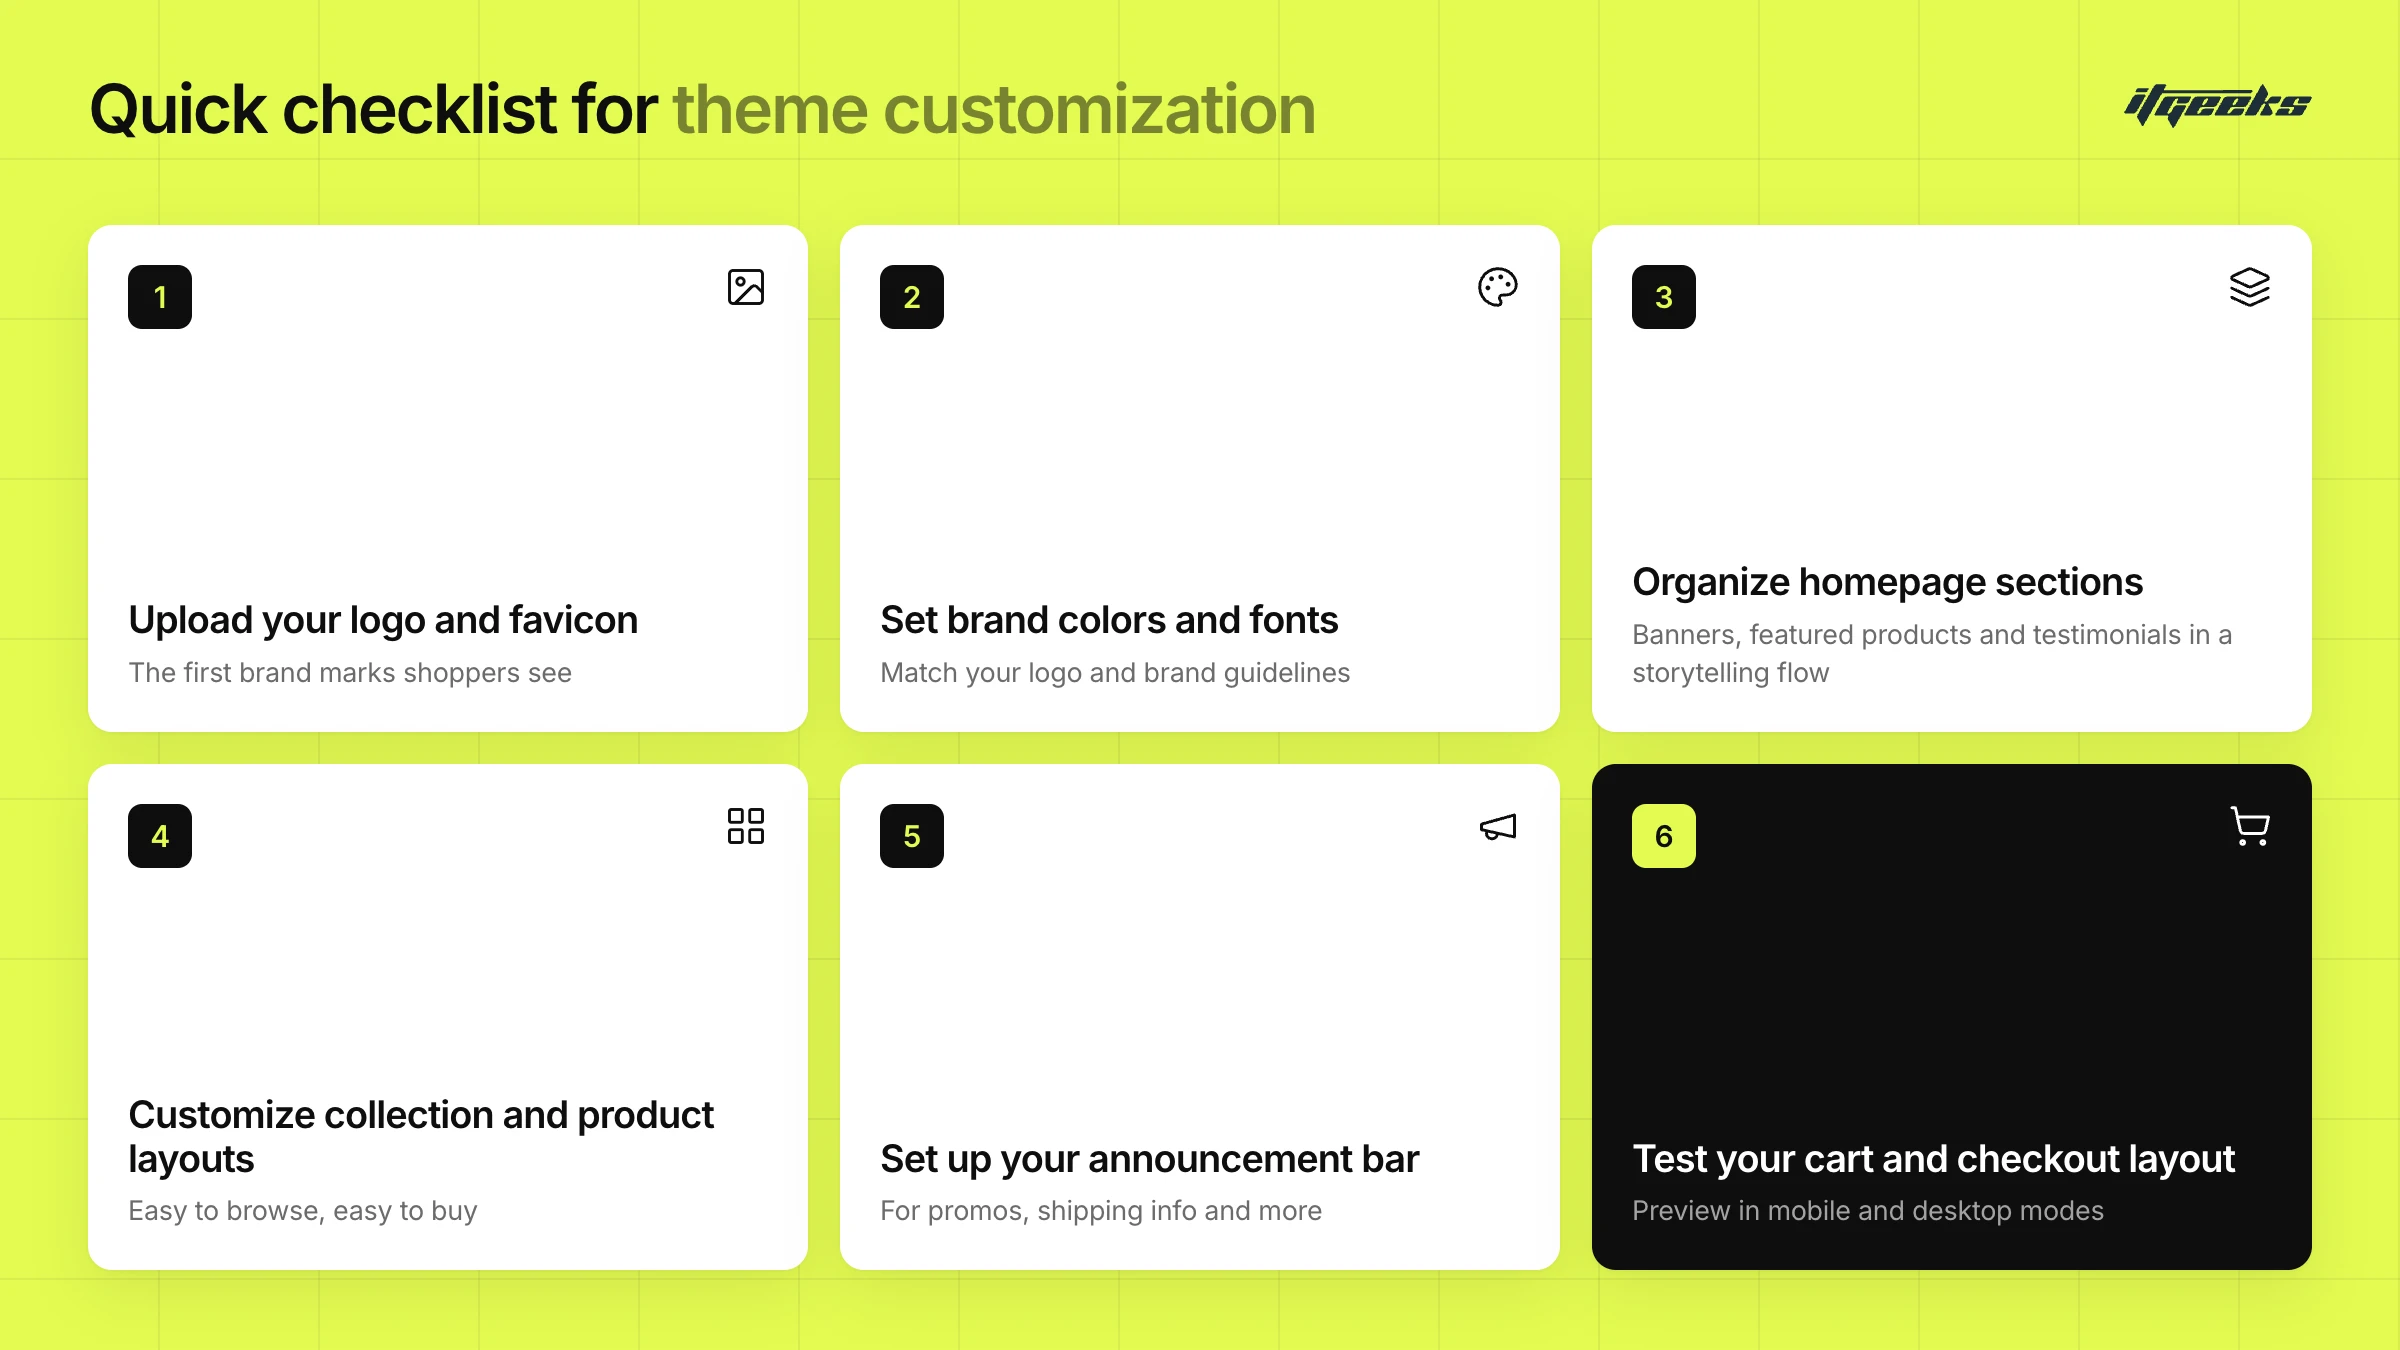
Pro Tip: Always preview a theme in mobile and desktop modes, most shoppers today are on mobile!
Read more about Shopify Store Design.
Customization Musts
Once you've selected a theme, it's time to tailor it to your brand:
Colors & Fonts: Match them to your logo and branding guidelines
Homepage Sections: Use banners, slideshows, featured products, or testimonials wisely
Header & Navigation: Make it easy for users to browse collections, access the cart, and search (you can edit your menus under Content > Menus in the Shopify admin)
Footer: Add trust signals, contact info, refund policy, social media links, etc.
Remember: Your theme sets the tone, but your content, structure, and attention to detail bring it to life.
Adding and Organizing Products
Products are the heart of your Shopify store. This is where your design meets function, and where browsers become buyers. But to make that happen, your products need to be added, organized, and presented in a way that’s both strategic and seamless. Let’s break it down.
Add Products Individually or via Bulk Upload
Whether you're starting with 10 products or 1,000, Shopify gives you flexible options to get them onto your store. Smaller catalogs can be added manually, while larger ones benefit from a bulk upload approach.
How to:
For manual entry, go to Shopify Admin → Products > Add Product
For bulk uploads, use the CSV import tool
Use Shopify’s sample CSV file as your format guide
Ensure product images, variants, and details are mapped correctly
Good to know: a product CSV can’t exceed 15 MB, so split very large catalogs into several files. Column headers are case-sensitive and must match Shopify’s sample file exactly.
Optimize Product Descriptions, Images, and SEO
Your product page is your 24/7 salesperson. A great product doesn’t sell itself unless it’s presented right, with clear content, visuals, and SEO optimization.
How to:
Write product descriptions that are benefit-focused and easy to skim
Use high-resolution images from different angles (add alt text for accessibility and SEO)
Fill in meta titles and descriptions with relevant keywords
Use clean URLs for better visibility in search engines
Creating Collections and Collection Pages
Once your products are added, the next step is to organize them in a way that makes sense to your customers. Collections help users browse more efficiently and increase the chances of cross-selling and upselling. Whether it's “New Arrivals,” “Summer Picks,” or “Under $50,” collections let you create meaningful groupings tailored to shopping behavior.
Grouping Products into Collections
Collections allow you to categorize products based on shared attributes like type, price, tags, or availability. These not only streamline the browsing experience but also make promotions and email marketing more targeted.
Examples: “Men’s Watches,” “Sustainable Products,” “Gifts for Her”
Add collections via Products > Collections in your Shopify admin
Dynamic vs. Manual Collections
Shopify gives you two options to build collections:
Automated (Dynamic): Products are added based on set conditions (e.g., “Product tag is Summer”). Ideal for large catalogs.
Manual: You add products one by one. Better for curated collections or promotions.
Each collection has its own page, so optimize it with descriptions, featured images, and SEO fields just like you would for a product.
Shopify is also moving to a newer collections model in which you can combine automatic conditions with hand-picked products and exclusions. If your admin still shows the legacy manual and automated types, they keep working.
Configuring Store Settings
Before going live, it’s essential to configure your store’s core functionality. This includes payments, shipping, taxes, and legal policies, everything needed to run your store professionally and in compliance with regulations.
Payment Gateways and Checkout Settings
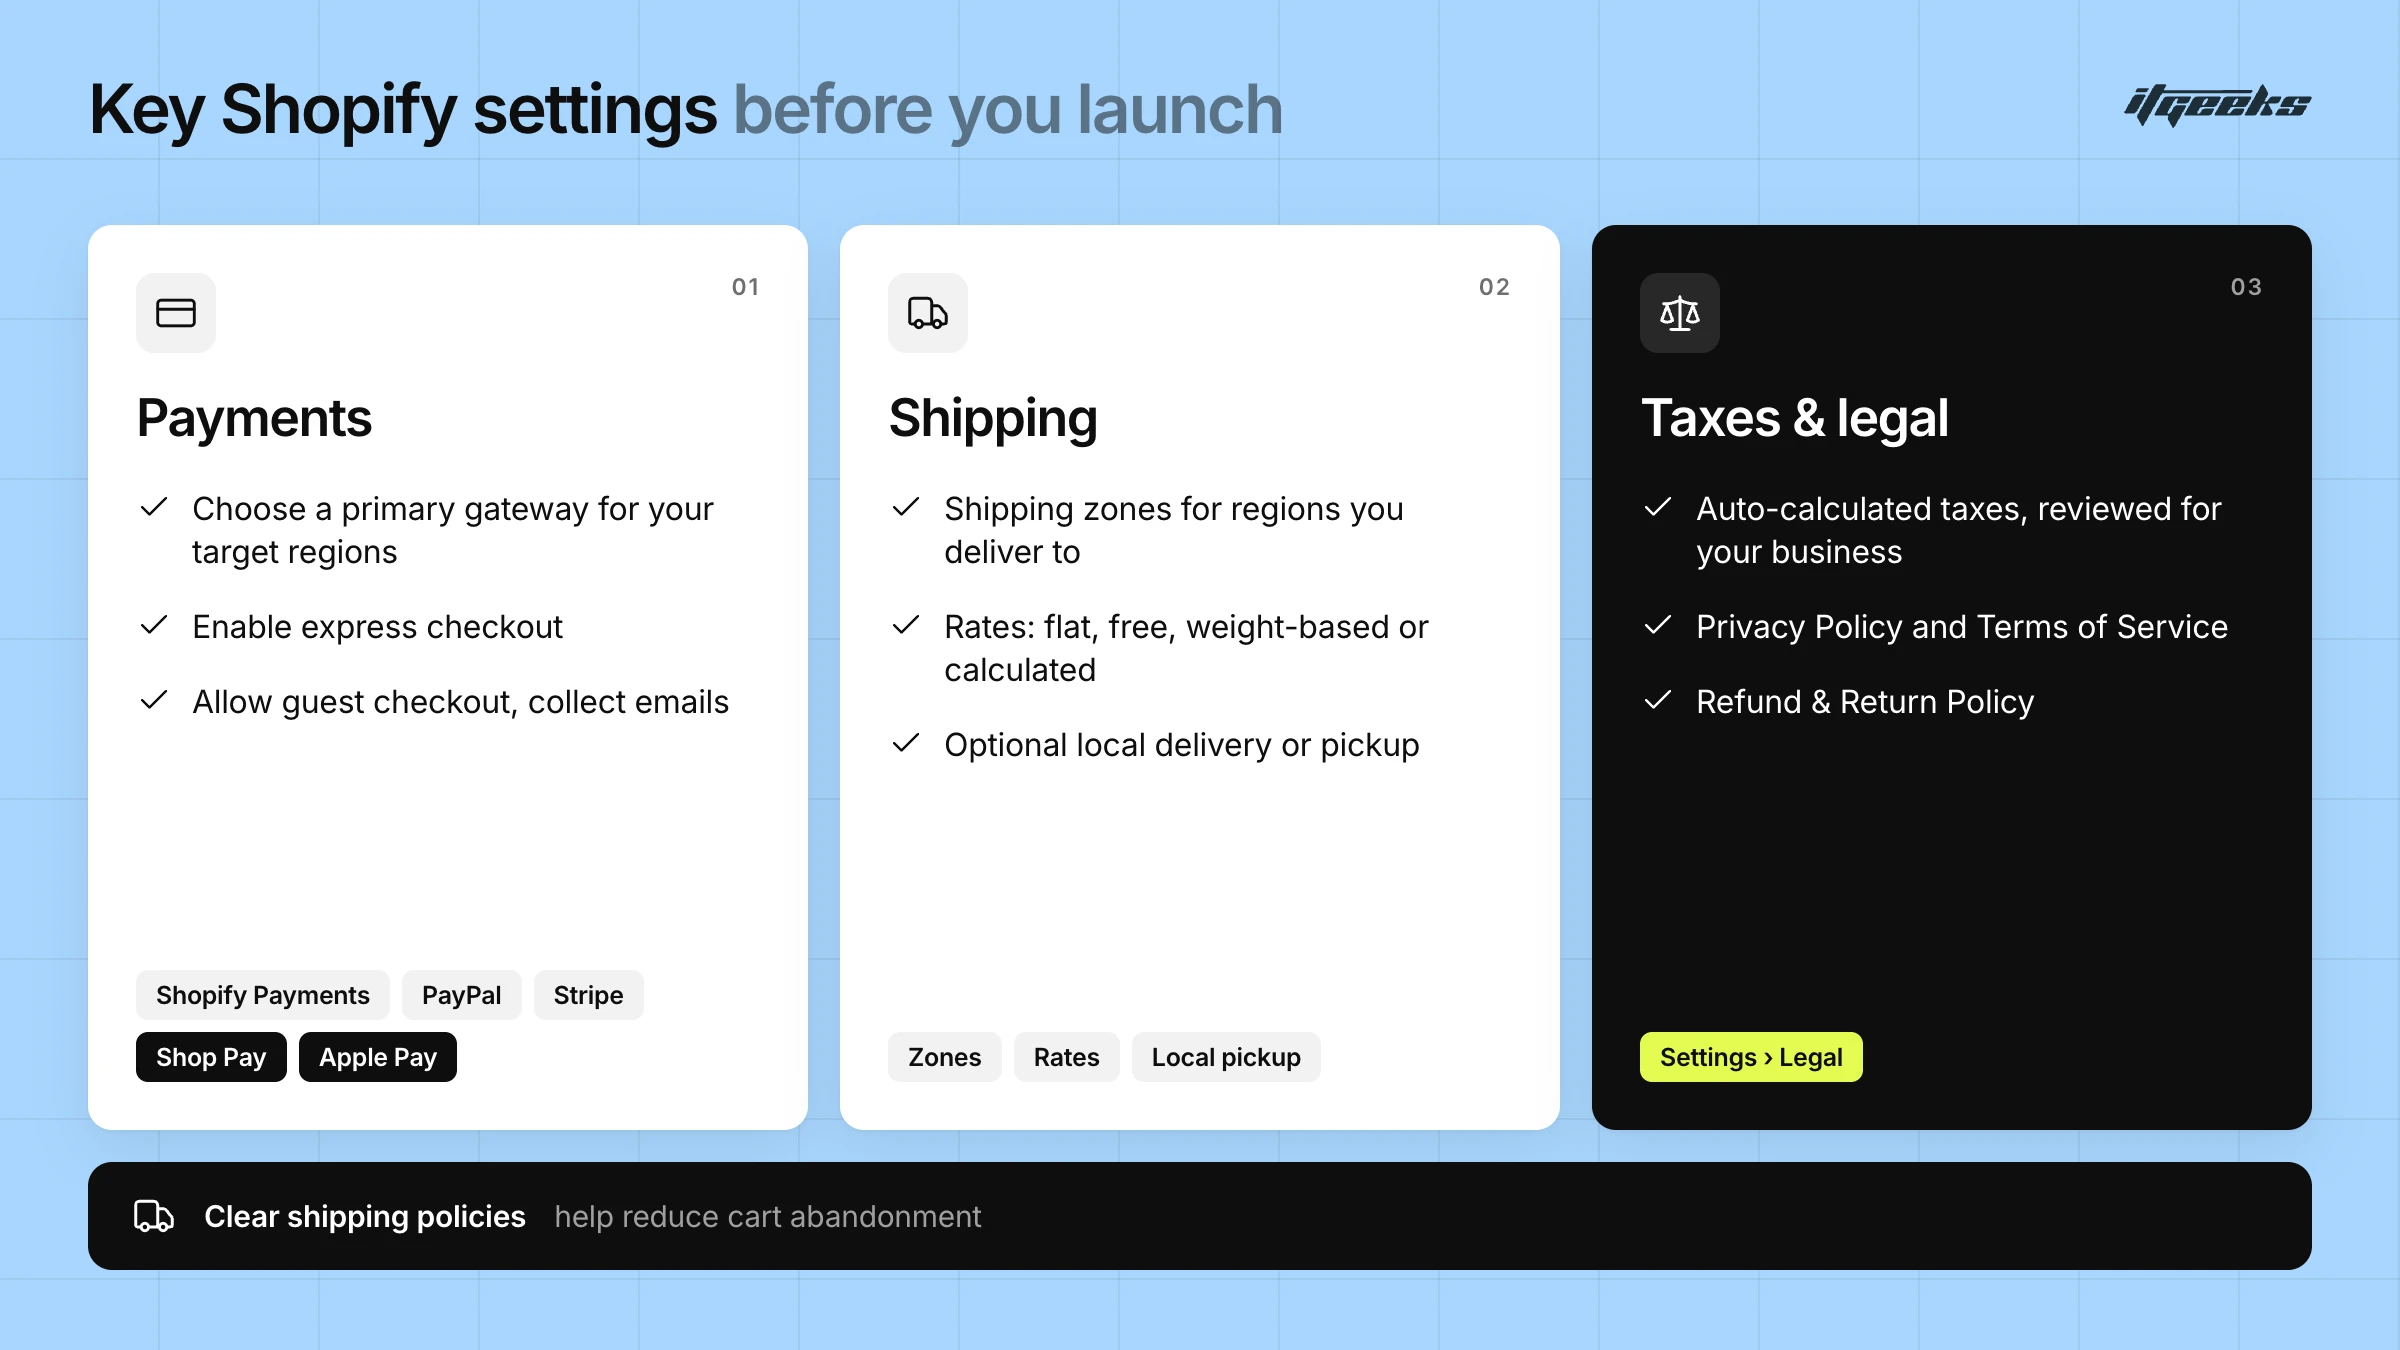
Shopify supports a wide range of payment gateways like Shopify Payments, PayPal, and Stripe. You’ll want to:
Choose a primary payment method based on your target regions
Set up express checkout options like Shop Pay or Apple Pay for faster conversions
Customize the checkout experience (e.g., allow guest checkout, collect emails for marketing)
Availability matters here. Shopify Payments is only available in certain countries and regions, and Shopify charges third-party transaction fees on orders processed through other gateways. PayPal is exempt from those fees when Shopify Payments is your primary provider. Check which options are open to your business location before you decide.
Shipping Zones, Rates, and Methods
Clear shipping policies help reduce cart abandonment. Set up:
Shipping zones for countries or regions you deliver to
Shipping rates (flat, free, weight-based, or calculated)
Optional local delivery or pickup options for nearby customers
You will find these under Settings > Shipping and delivery. Shipping profiles hold your zones and rates, and a country must be in an active market or customers there can’t order. If you use tiered rates, make sure the tiers cover every possible order total or weight: a gap causes a shipping error at checkout.
Taxes and Legal Pages
Shopify can auto-calculate taxes based on regions, but review them based on your business requirements. Also, set up:
Privacy Policy
Terms of Service
Refund & Return Policy
You can use Shopify's policy templates and automated policies under Settings > Policies and customize them to suit your brand.
Shopify’s automated store policies can generate your return and refund policy, terms of service, shipping policy and contact information from your store settings. They are templates, not legal advice, so review them and consult a lawyer where needed.
Store Personalization with Metafields
Want to go beyond Shopify’s default product and page data? That’s where metafields come in. These allow you to store and display custom data like ingredient lists, size charts, delivery times, or care instructions, tailoring the experience even more.
Using Metafields for Custom Data
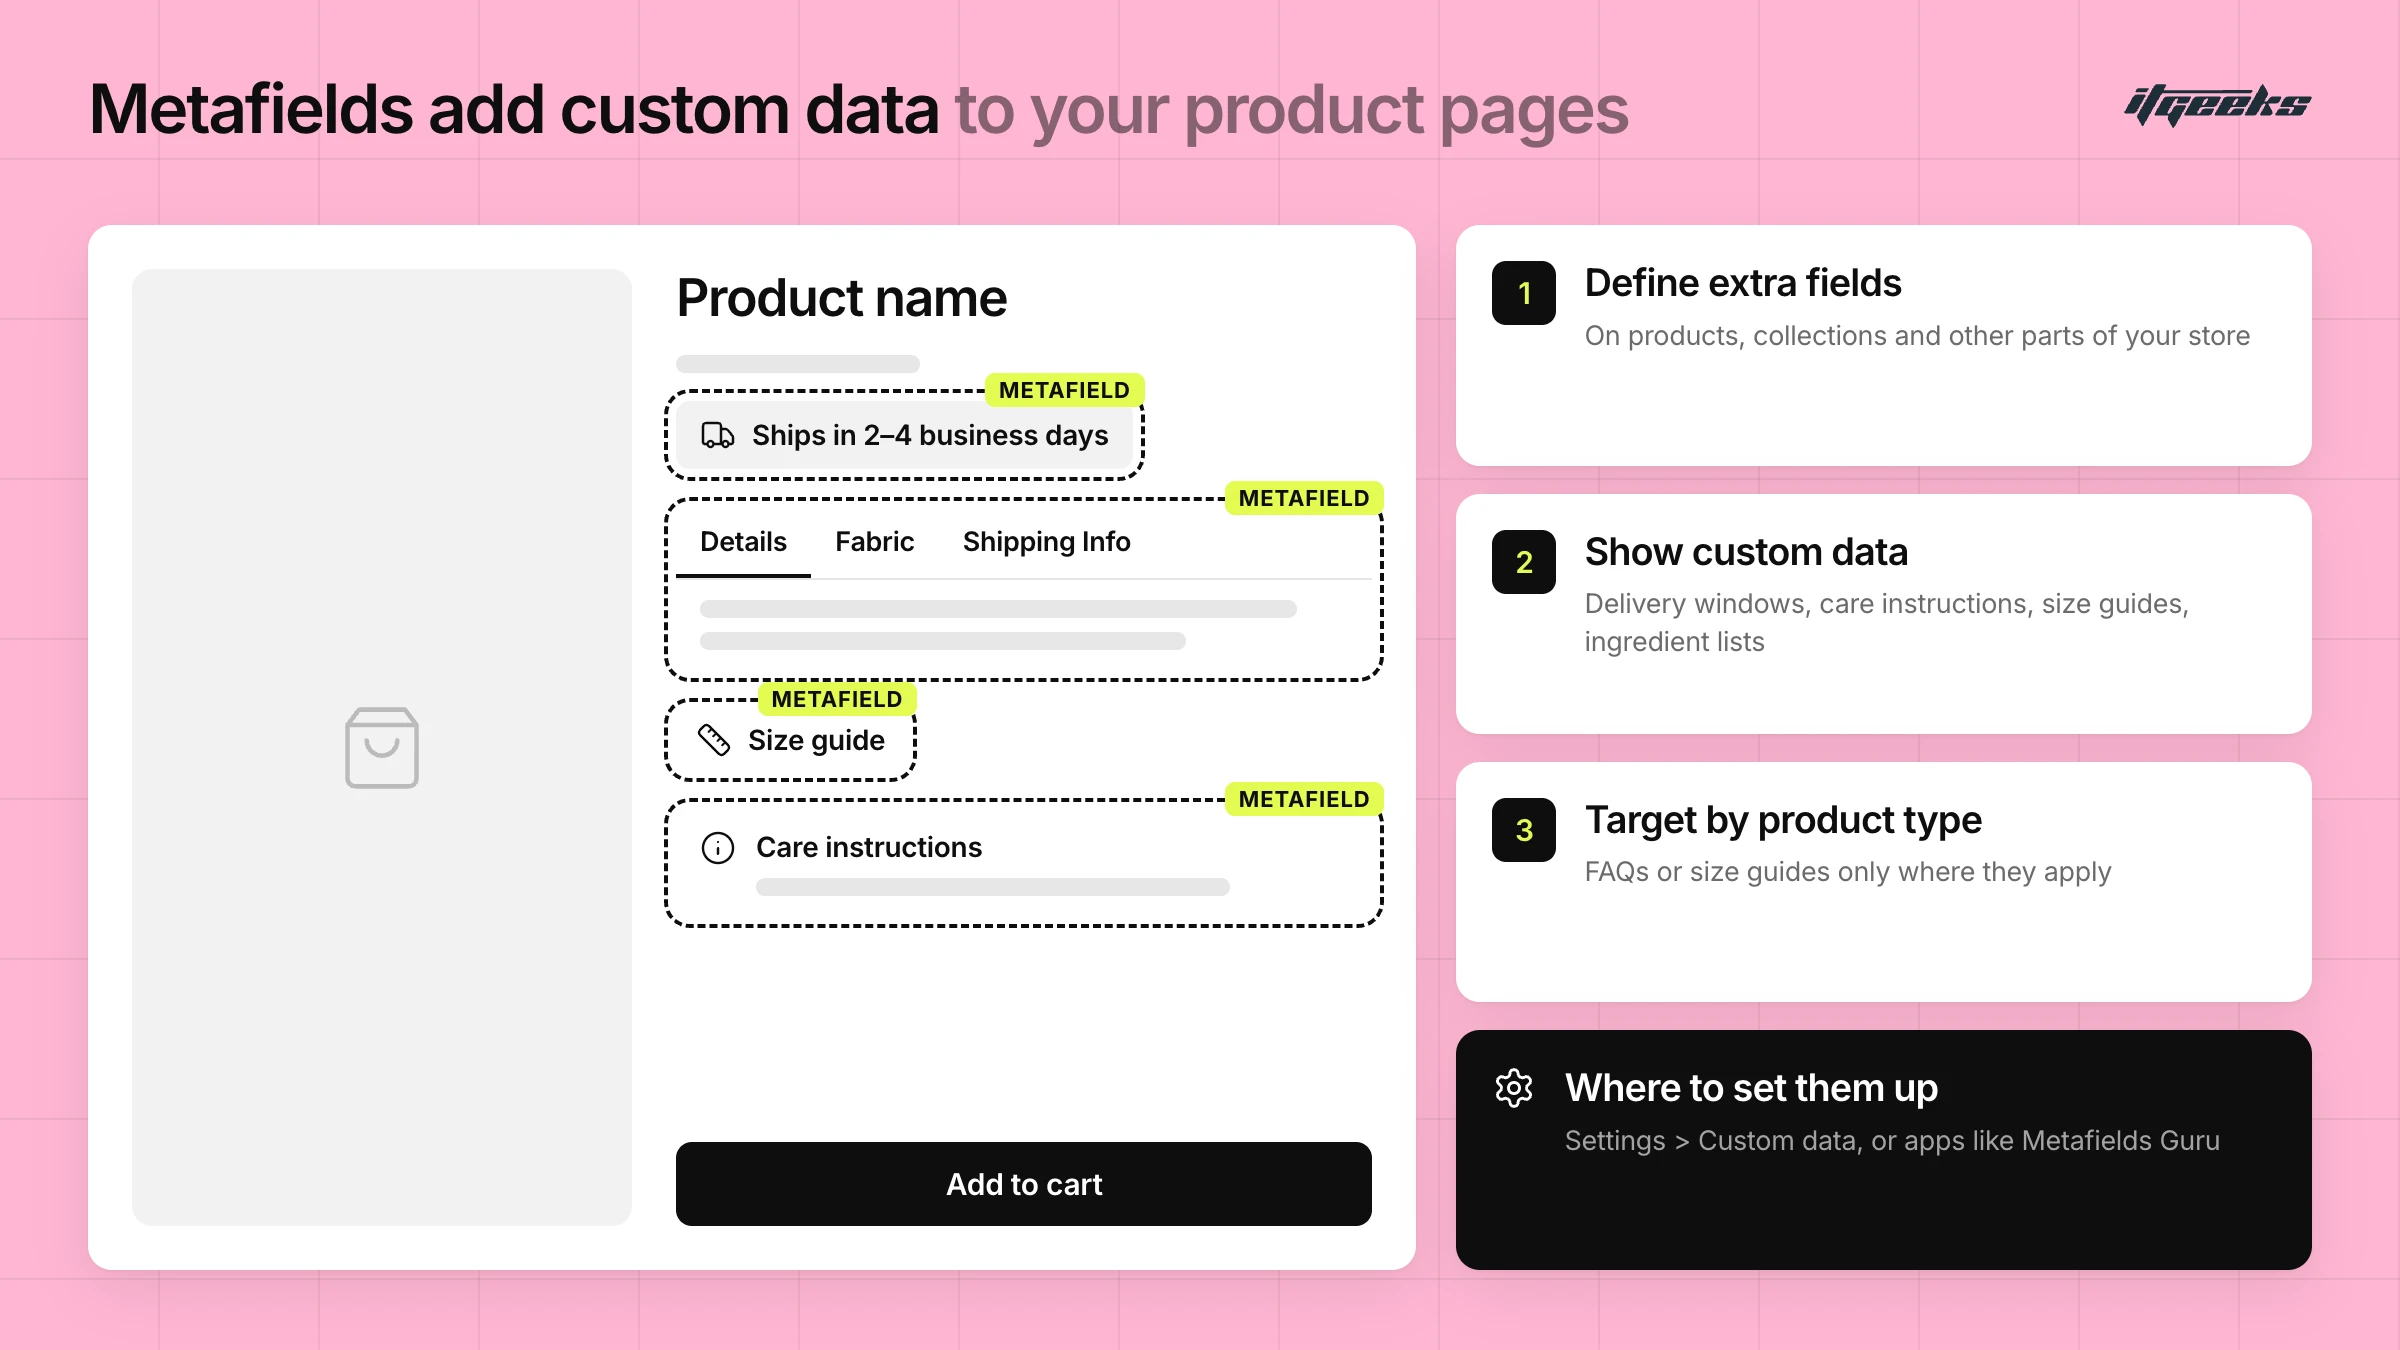
Metafields let you define extra fields on products, collections, or other parts of your store. You can use them to:
Show estimated delivery windows
Display care instructions beside product descriptions
Add size guides that only appear for clothing products
Use Shopify’s built-in metafield editor (Settings > Metafields and metaobjects, or the Metafields section on a product page) or apps like Metafields Guru for more advanced control.
If your theme supports dynamic sources, you can connect most metafields in the theme editor without touching code.
Examples of Dynamic Content Powered by Metafields
“Ships in 2-4 business days” on the product page
Custom tabs like “Details | Fabric | Shipping Info”
FAQs that appear only on certain product types
Essential Apps and Integrations
Your Shopify store becomes much more powerful when paired with the right apps. From marketing and analytics to customer support and trust-building, apps extend your store’s core features to better suit your business needs.
Recommended App Categories
Analytics: Google Analytics, Lucky Orange, Hotjar
Email Marketing: Klaviyo, Omnisend
Reviews & UGC: Loox, Judge.me, Yotpo
SEO & Speed: SEO Manager, TinyIMG
Conversion Boosters: Reconvert, Frequently Bought Together
Customer Support: Tidio, Gorgias
Before installing, make sure to read recent reviews and check how each app affects your store speed. And once all this is done comes the testing point. The Test and Launch.
Want help choosing? Read our take on getting the most from the Shopify App Store.
The Test and Launch
Testing is non-negotiable for seamless Shopify Store Setup. Think of it as your final quality check before inviting the world in.
Here is your checklist to make sure you have covered
Store Navigation & UX: Test menu links, search functionality, and page loading speed. Ensure mobile responsiveness across devices and browsers.
Checkout Experience: Place a test order using different payment methods. Try both guest and registered checkout flows. Check email confirmations and thank-you pages.
Product Pages & Cart Functionality: Verify variants, prices, images, and inventory updates. Add/remove items to/from cart and check discount codes.
Email & Notification Settings: Customize your order confirmation, shipping updates, and abandoned cart emails. Test triggers to ensure customers get the right messages.
Legal & Policy Checks: Read through your policy pages for clarity. Ensure all disclaimers and return instructions are clearly visible.
Once everything is tested, remove the password protection, and hit “Launch”.
How to place a test order: use Shopify’s test payment gateway, or Shopify Payments test mode if you use it. Neither charges you, and test orders don’t appear in payouts or reports. Note that you can only test a payment gateway after choosing a paid plan, and customers can’t place live orders while your payment providers are in test mode, so switch test mode off before launch.
To go live, open Online Store > Preferences, find Store access and switch off private mode. Confirm a payment provider is active first, because checkout needs one to accept orders.
Shopify Store Setup FAQs
Can I set up a Shopify store before I pay?
Yes. During the free trial you can add products, create collections, configure taxes and shipping, set up a payment provider and explore the theme and app stores. Checkout stays inactive until you turn off private mode or choose a paid plan, and a store whose trial ends without a plan is paused, with your work kept.
Do I have to buy my domain from Shopify?
No. You can buy a domain through Shopify, transfer an existing domain to Shopify, or connect a domain from another provider by updating its DNS records. Connected domains usually start working within two hours, but it can take up to two days.
How do I test my Shopify store before launch?
Place a test order with Shopify’s test payment gateway or Shopify Payments test mode. No money is charged and the order is kept out of payouts and reports. Then check navigation, cart, discount codes, confirmation emails and policy pages on mobile and desktop.
How do I take my Shopify store live?
Go to Online Store > Preferences, find Store access and turn off private mode. Make sure a payment provider is set up and test mode is off, then share your store link.
You are not alone in your Shopify Store Development journey - ITGeeks have got your back
Launching a standout takes more than just a theme and a few clicks, it needs expertise. That’s where ITGeeks comes in.
As a Shopify Platinum Partner, we turn ideas into fast, secure, and scalable stores that are easy to manage and built to grow. From full-stack builds and custom checkouts to lightning-fast Hydrogen storefronts, we do it all, and we do it right.
Whether you're just starting out or scaling big, our team stays with you beyond launch with ongoing support and solutions tailored to your brand.
Moving from another platform? Explore our Shopify migration services.
Talk to our experts today, visit - itgeeks.com